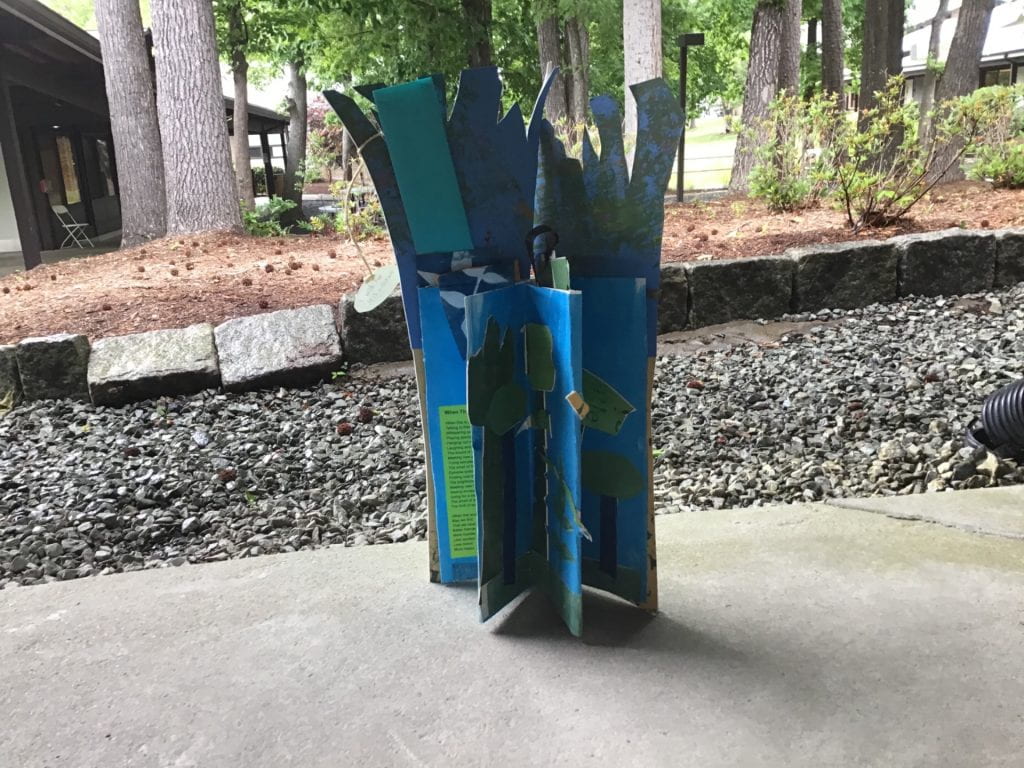
Over the past MONTH, we’ve been working on making a book shaped like a tree. Let me explain.
We’ve done many stages of working with this book, with some being Akua ink painting, collating, adding pockets and a wish we want! So, let’s start from the beginning, on March 15th.
We first started by painting a blue background that would be the backdrop for our book. This background would one day have many layers of stuff over it. We painted our background blue, because since our book was going to be a TREE, it had to be about nature. So, we were going to be making a little forest on the inside of our book. To make a forest, we needed a sky, of course, which is why we made our backdrop blue. I picked a more light shade of blue, and then painted a darker shade. Since there was no way of keeping track which paper was who’s, we all painted two different papers, with two different shades of blue, and then for the next part of the process, just picked whichever paper we liked. So, onto the paper folding!
Since we were only using one piece of paper, you might be wondering, how did you make a book… out of one piece? Well, it was similar to the way you would make a card. We folded it sideways, and then folded one piece in the middle, to add a sort of flap that would become a page. One very important part of that flap was to make it hollow, because we were going to be putting something in there. Anyway, now that we had our pages, what are we going to do next? You may be thinking that we would collage our forest onto the backdrop and be done, but no, no no. We still have much too many things to do before that!
Next, we did some printing. Not the Akua printing, but word printing. We got some really hard paper, it was like poster board, and we painted onto it. But before I tell you the rest, I have to explain what we did before this project started. We had written little poems about trees. It was a little Haiku, and if you don’t know what that is, it is a traditional Japanese type of writing poems. The first and top line is 5 syllables. The second and middle line is 7 syllables. The third and bottom line is 5 syllables. So, in total, you should have 17 syllables in your poem. The thing about Haikus, is that they don’t have to rhyme, and traditionally they don’t! This makes for some interesting poems about trees. Here’s the one I wrote:
This tree is quite nice.
I appreciate the leaves.
They blow in the wind.
I think it was a pretty good poem. Anyway, we put those poems on stencils, and printed onto the poster board with them. Before we did that, though, we had to paint the poster board. You could either paint it green or brown! Naturally, I chose green, as it’s the nicest color ever, and if you disagree, you’re invalid. You didn’t get to print your exact poem, like for the backdrop, instead you picked random ones and did those. It was very fun because if you twisted the stencil it made some funny letters. I think I stenciled very well. After we finished “stenciling,” we put away the poster board. We would then pick a random poster board (like the backdrop, again). This part was very important for the last part of this post. We cut the top of the poster board to look like branches! We then folded it so it matched the back of our book, after that, we glued it on and that was that.
Next, was our Akua ink printing. This was most definitely the coolest part of the process, and we even got help from local artist Peg Gignoux (here is her website:https://gignouxart.com/)! She helped us with a lot of things during this project, so a big thanks to her. Essentially, what we did was use this rare ink named Akua to print onto paper that we would later use to collage. This was really a connection with nature, because we got leaves, flowers and sticks all the print with. To Akua print, first you get a roller, and put it in the ink. You then roll over a paper that has what you want to print onto it, such as a flower of leaf. You should get a paper covered in Akua ink, with a blank spot where you put your object. After printing onto that paper, you roll the roller on a blank piece of paper, and since most of the ink had gotten on the first paper, it’s a bit lighter. But, you still have ink on the roller where the object was, so that part is darker. The result is an extremely realistic print of a flower, leaf or stick. I chose some leaves that were almost symmetrical, some dandelions and one of those flowers that you blow on. The best I can describe the flower, is that when you were a kid, you probably picked it up and blew onto it? I don’t know what it’s called, but I used two of those. I also used a leaf I found on the ground. I think the final project turned out great, and we would later use those to collage onto our book.
Now, the part you’ve (probably) all been waiting for. The collage! Peg also helped us with this part too! This was probably the longest part of the process of building a book. The first thing we had to do was cut out our “trees” and “plants.” At first, I did the trunk first out of, maybe brown or green and then the leaves of the tree. The cool thing about this artistic freedom is that the trees and plants could be any color! WE WEREN’T RESTRICTED BY THE LAWS OF NATURE ANY MORE. And it was great. I’m pretty sure I made one tree trunk purple! But it looked great, so who cares. Anyway, after doing that for a little bit, I took inspiration from one of my classmates, and made one big pillar for a tree. Basically, what I did was cut a big spike and add little cuts going through the tree. And it looked really cool, like a big staff crashing out of the ground. Totally worth it. That’s not all, though. You think we can have just trees floating around in the air? Well, if you said yes, you’re not just wrong, you’re stupid, because that defies the laws of physics in about 20 ways. Anyway, the point is that we had to add a ground. And, if you were normal, then you probably would have just added a green slab as the ground. But if you know me, I’m not normal. I mean yes, I did add a green slab, but that’s not all! I also added water! I mean, nature has ponds and lakes, so I added a blue slab too! How interesting. Anyway, now that I had finished the trees, I wanted to add a more realistic vibe, so I added moving things, such as leaves flying in the wind. And let me tell you, it was definitely worth it. I thought it looked really nice in the wind! Also, by the lake, I added a boy walking his (green) dog. I had recently adopted a dog, and I wanted to show him in it! But, there was a problem. He broke! The dog in the collage not in real life. I fixed it though, and to top it all off, I added it raining beside the lake/pond. This was definitely a nice touch, because unlike most people, I really, really like rain. I also like sunny days, but when it’s rainy by a lake… beautiful. And to finish it, I added a couple shrubs from the Akua ink prints we made. I cut out the leaves and added little mini trees and shrubs. Perfect.
Now that our tree was mostly finished, it was time to add all the little things. The first thing I added was little envelopes to put things in. Remember the pocket we made for the little flap? We glued the envelopes on the inside of there. But, I couldn’t have the envelopes just being there, all yellow and ugly! I covered it up with some Akua prints as a solution! It looked great. One of the things I put in the envelopes was a picture of my face! One might say it’s egotistical, but I just say it’s art!
The next thing I put onto my book was a paper we wrote called Salute to My Roots. The point of this was to reflect on someone that’s guided us through life. I know everyone was going to do their mom, or dad, but no! I was different. I was a visionary. Basically I just did my brother. It was cool. I talked about him, and how we used to fight a lot, but now we get along better. Here’s an excerpt of the paper I wrote (he’s a sophomore now, for comparison):
We both like the same general music, even if we’re a little different. And we both have the same sense of humor, that’s for sure. I actually remember when he was in 6th grade, and he seemed so old and mature. But now that I’m in 6th grade, I wonder how younger people see me? Do I seem old and mature?
I think it was pretty we printed it out, and glued it onto my book. It looks great!
What is a life list? Well, imagine this. What would you do with no limitations. Infinite money, you never die, no one stopping you… what would you do? Write it all down, and you have a life list. Of course, we HAD to write one of these for our book. They’re so cool! I definitely would recommend doing it. It was so fun to do, and it really made me think. I think the point of this was to just see how far our imaginations could stretch. And boy, did mine stretch. Here were my top ten on my life list, just to see:
10. Blow up a skyscraper of an evil corporation in an act of goodness
9. Become the richest man in the observable universe
8. Go back in time
7. Change the future
6. Visit the fourth dimension
5. Visit an alternate reality
4. Conquer all realities, universes and other planets
3. Ascend to a higher plane of existence
2. Become the king of all gods
1. Draw a circle
I do think the circle one was necessary. It is very hard to draw a perfect circle. I glued this onto the side of my book, and it looked great.
We are in a global pandemic at the time of this being written. So what would you do when it’s over? A famous poet wrote a poem just about this. The poem itself was beautiful! But we wanted to write one ourselves. So, of course we did! And what better place to put it than our tree book! This was a very fun, and it really gave me insight onto what I want to do when this pandemic is over. I think the main theme was that u would want to revisit my friends. We haven’t been able to see each other for so long, and now that this pandemic is finally ending, I think we can finally start doing this again. This was a good brain exercise, because I do want to know what will happen when this ends? Will we go back to normal? Will we never be the same? Will people still wear masks? I guess we’ll see in a couple months.
Right when we were finishing up this project, our class read a book call Wish Tree, by Katherine Applegate. The main character in the book is a tree called Red. And this tree is special. Many people gather per year on one day to hang up wishes on her branches. So, she has come to be known as the “Wish Tree.” And since the character in the book is a tree, and we’re making a tree book… it made sense to put one of our wishes on the “branches” of our “tree.” This is why I said the branches were important. We wrote the wish on a piece of paper, and then tied it on to the branches. I would tell you my wish… but it’s a secret. Good luck figuring it out!
After this month long journey, we were finally done. And boy, was it worth it. The final project was so beautiful. It looked like something that could be in an art gallery. And that’s because it was!
It was put in the Frank Gallery (here’s the website: https://www.frankisart.com/ and on May 15th it was opened to the public! It was an extreme honor to be in a gallery! Making this book was an extreme experience, and an amazing time! I loved working on this project, and I really loved the support given by everyone.


 waste of space


 The first daily habit we did was planking, and this was a kind of hard, but I got used to it. I was kind of disappointed when I only planked for like, 3 minutes, because I heard that last year, some people went for 30 minutes, but at the time, we had only gone up to 3 minutes. But overall it was a cool, fun experience.
 Something that interests me is playing guitar. I haven’t played it that much lately, but I really like playing the guitar, and I have one for myself. A cool thing about different guitars is that a bunch of people “name” them. Like Brian May’s is the “Red Special”, and Billie Joe Armstrong’s is “Blue.” I just thought it was cool that they name it.